Object Catalog Designer
At its core, Archipeg stores objects and associations. Object Catalog Designer in Archipeg allows you to view, create, edit, and delete objects and associations between them.
To start working with Object Catalog Designer, access one of the existing projects by clicking on its name. Next, click on the "Manage Objects" navigation link.
Toolbar Buttons
Catalog designer's toolbar buttons allow performing the following actions:
- Refresh the catalog view (
 ), which is helpful if another user of the same project has changed objects after you opened the screen.
 - Find an object by name (
 ) to perform actions, such as editing it.
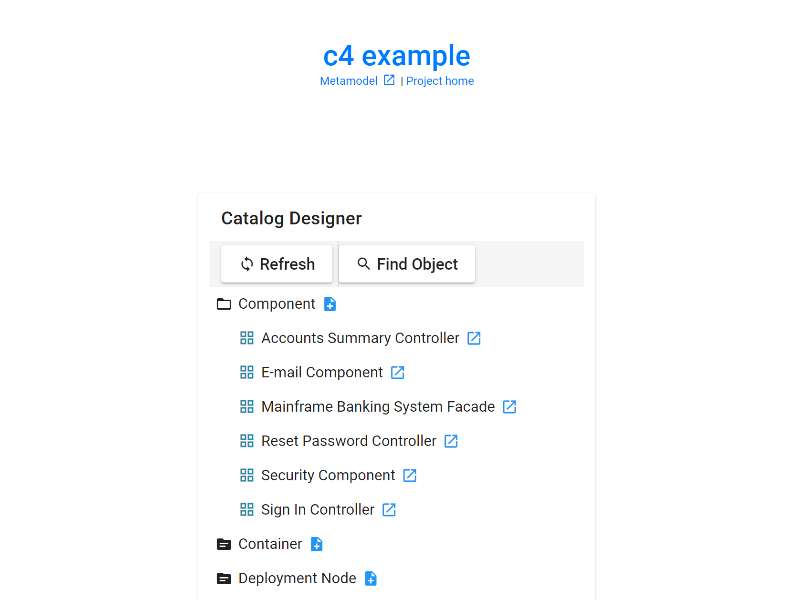
Object Type Folders
Catalog designer looks like a tree of folders. Each folder corresponds to an object type, and thus, you can locate the object of a given type by expanding the corresponding folder in the catalog designer.
To expand a folder in catalog designer, do one of the following:
- Click on the folder icon (
 ) that sits in front of the folder name (i.e., object type name).
 - Click on the folder name (i.e., object type name).
If there are any existing objects of the selected type, they will display under the folder name; and the expanded folder's icon changes from dark to the white folder with outline only (![]() ).
).
Objects shown in the catalog designer tree have icons (e.g., ![]() ). An icon represents an object type, which can help distinguish objects of different kinds from each other.
). An icon represents an object type, which can help distinguish objects of different kinds from each other.
You can tell whether an object type has any corresponding objects by its icon before expanding it. The empty object type has a solid dark folder icon (![]() ), while the non-empty type has a dark folder icon with horizontal lines inside it (
), while the non-empty type has a dark folder icon with horizontal lines inside it (![]() ). Note that folder icons might not reflect the existence or deletion of the objects of that type if multiple users are working on the same project simultaneously. That is, another user might have created or deleted objects, and your screen does not reflect it. To see the up-to-date folder icons, you can refresh the catalog designer screen. On the positive side, if an object of the expanded (clicked) type exists, it will display when you expand the type folder irrespective of its icon before expanding.
). Note that folder icons might not reflect the existence or deletion of the objects of that type if multiple users are working on the same project simultaneously. That is, another user might have created or deleted objects, and your screen does not reflect it. To see the up-to-date folder icons, you can refresh the catalog designer screen. On the positive side, if an object of the expanded (clicked) type exists, it will display when you expand the type folder irrespective of its icon before expanding.
Creating a New Object
There are two ways of creating a new object using object catalog designer:
- Double click on the folder (i.e., object type) name.
- Click on the addition icon (
 ) located next to the folder (i.e., object type) name.
This action will open a new object editor dialog. Object editor dialog is described in the later section on this page.
Viewing or Editing an Existing Object
There are two ways of editing an existing object using object catalog designer:
- Double click on the object name.
- Click on the opening icon (
 ) located next to the object name.
This action will open an existing object editor dialog. Object editor dialog is described in the later section of this page.
Object Editor Dialog (for New Objects and Editing Existing Objects)
Object editor dialog is the same interface displayed on the screen for adding a new or editing an existing object. This dialog is a simple questionnaire that allows you to create, view, or modify an object of the selected type.
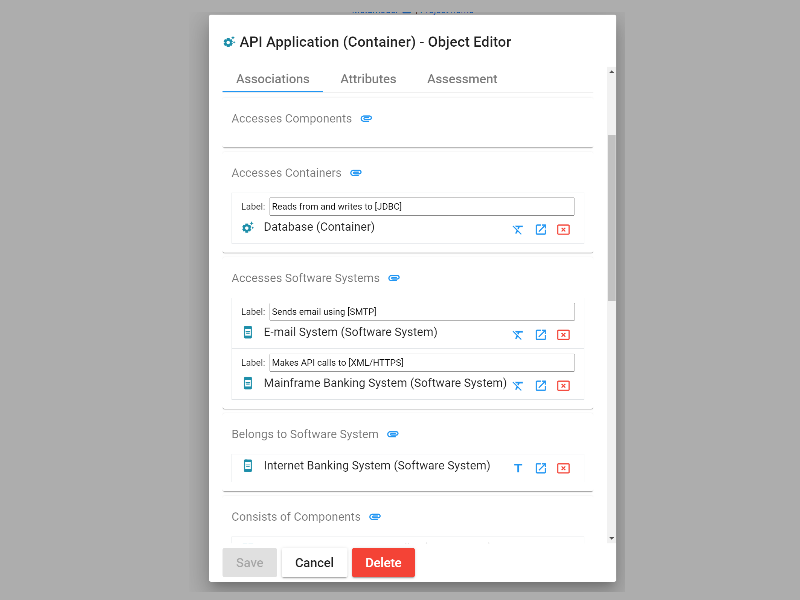
All objects in Archipeg have a required name and an optional description, which are the top-most fields in the object editor dialog. You can specify additional information about the currently open object, such as associations, attributes, and assessment. You can switch between the various views using the corresponding tab buttons located under the description.
Associations
Associations exist between objects, allowing you to link different objects with each other. These links are also handy to traverse the objects by going from one object to another connected via an association. Additionally, these associations become visual links between the object elements when exploring a graph or working with diagrams.
Note that every association in Archipeg has two ends, so when you are linking one object to another, you are also creating a reverse link. Such behavior helps to traverse the object graph in two directions - from source to target and from the target to the source object.
To create an association from the currently open object to another object (i.e., to link these objects), do one of the following:
- Double-click on the association name.
- Click on the attachment icon (
 ) located next to the association name.
As a result, you will see a list of objects that have a compatible type. If the object you want to link does not exist yet, you can quickly create one by clicking the "Create" button on top of the current dialog window; when done, you will see the list again with your new object in it. Select the objects you want to link to the currently open object and click the "Done" button. You will see the connected objects in the object editor dialog.
You can also override the default association name for any linked object (![]() ). If you do so, this custom label will also display on the arrow between these objects in any diagram.
). If you do so, this custom label will also display on the arrow between these objects in any diagram.
At this point, the links are not saved to the model, so you need to ensure that you hit the "Save" button when you complete modifying the object.
To remove an existing association, find the linked object in the editor dialog, and click on the removal icon (![]() ) next to its name.
) next to its name.
Attributes
An attribute is a key-value pair attached to an object, allowing you to describe a characteristic of the object or specify additional information about it.
Click on the addition button (![]() ) to enter a new attribute's information. Attribute's name is required, and it cannot repeat across the attributes within the same object. You can also change an existing attribute's name or value or remove it at any time (
) to enter a new attribute's information. Attribute's name is required, and it cannot repeat across the attributes within the same object. You can also change an existing attribute's name or value or remove it at any time (![]() ).
).
Assessment
The Assessment tab of the object editor dialog allows capturing information about the object that can be used to assess the object's fit for purpose or investment worthiness. Below, we will walk through each subsection.
Assessment Category
Archipeg allows assigning an assessment category to an object based on Gartner's TIME model. This approach can help with portfolio management (e.g., Application Portfolio Management or Product Portfolio Management) or to communicate the object's lifecycle or state to other team members who work on the same project. You can display the colorized assessment category tag when exploring a graph or working with diagrams. Additionally, data analyzer helps you visually analyze your objects by assessment categories to derive insights and plan action items.
A newly created object has no assessment category out of the box (i.e., it displays as "None"). To change the assessment category, pick a new value from the dropdown and save the object.
Choose from the following assessment categories:
- None: no assessment category.
- Tolerate (re-engineer): poor business fit, strong technical fit.
- Invest (innovate, evolve): strong business fit, strong technical fit.
- Migrate (modernize): strong business fit, poor technical fit.
- Eliminate (replace, consolidate): poor business fit, poor technical fit.
You don't need to memorize the above definitions since a selection wizard is available in the Archipeg application. Click the "help me choose" button next to the assessment category dropdown to display the wizard dialog window; afterward, answer the questionnaire to determine the correct value for your object's assessment. After clicking the "pick" button in the wizard, the resulting category will appear in the assessment dropdown of the object editor.
Financial Value
In this section, you can capture the object's financial value, including its revenue and expense.
The revenue field can be used to attribute monetary returns to the current object. This value can help judge the financial worthiness of an application, technology, or other asset.
The expense field can be used to associate monetary cost with the current object. This value can describe the organization's licensing or purchase costs due to this object.
Next to the above two fields, you can also see the automatically calculated total financial value.
Deleting an Object
If you want to delete an existing object, open it for modification, which will display the object editor dialog. At the bottom of this window, you will see a "Delete" button. After confirming the deletion request via an additional confirmation screen, Archipeg will delete the object from the model. Be cautious with this action, as it cannot be undone.
Deleting an object clears associations from or to this object that exist in Archipeg's model.
Traversing an Object Knowledge Graph
Earlier, we discussed how you could link objects to each other. Now it is time to learn how to leverage those associations and traverse the graph of connected objects in Archipeg's model. Object graph traversal is helpful to find answers to common questions such as applications that store a specific data object or people who participate in a given business process.
Note that a more straightforward way to traverse the object graph visually is by using an object graph explorer. This section explains how to traverse the graph via a catalog designer.
Start by opening an object that has one or more objects linked by association. Find those object names in the object editor dialog, and perform one of the following actions:
- Double-click on the linked object name.
- Click on the opening icon () located next to the linked object name.
This action will close the currently open object editor dialog and reopen it for the newly selected object.
You can repeat the above steps to continue traversing the graph until you find the needed answer.
Object Finder
Object finder lets you locate an object by its name. This screen consists of a toolbar, search form, and the results pane. You can switch back to the catalog designer (![]() ) at any time.
) at any time.
Type a part or full object name into the search box and execute the search by clicking the corresponding button. All objects matching the provided text input will display under the form.
You can work with the found objects as you do with the catalog designer tree. The only difference between the two views is hierarchical versus the flat structure of the data.
Integrated Help Hints
Archipeg web app comes with built-in help hints, which are described in detail here.
Object catalog designer seamlessly integrates with the help hints. If you turn the help toggle on, you will see the help icons (![]() ) displayed in the catalog tree and the object editor dialog. You can click these icons to quickly learn about an element you see on the screen, such as object type or association.
) displayed in the catalog tree and the object editor dialog. You can click these icons to quickly learn about an element you see on the screen, such as object type or association.
See Also
- Working with Projects.
- Object Graph Explorer.
- Working with Diagrams.
- Data Analyzer.
- Help and Support.